UPDATE
Added new fields to contacts. Contact companies now have fields for credit, credit limit and credit terms. Credit terms will automatically transfer to accounting.
Contact offices now have a 'notes insert' field. Text in this field with be added to the shipment notes when the office is selected. This field should contain any instructions on how to work with this contact office.
UPDATE
Added a permission to manage contacts. Every role and user was given this permission.
UPDATE
Air shipments may now be submitted to AES.
UPDATE
Consolidations are now managed by going to Tools -> Consolidations. In the main screen clicking a -300 also goes to consolidation management. Clicking a -200 shows link to the consolidation items inside a master. Clicking a -Master shipment number goes to the master. Consolidation management will now allow splitting one shipment over several containers of a master.
UPDATE
Multiple shipments can now be created from one quote. Open any quote (whether it has a shipment or not) and click the "transfer to shipment screen" link to fill out a shipment. Quotes with multiple shipments are listed in the quote log.
Added a quote statistics report, very similar to the shipment statistics report. Both of these now have an option to remove subtotals.
UPDATE
Image and PDF files can now be attached to shipments with "file attachments", found under documents. Users who can manage offices can
add this document to the document list.
UPDATE
The four primary locations (receipt,loading,unloading,delivery) all now draw from a much larger selection of locations. When any
of these is selected it will have a UN code. If a locations with an AES label is selected it will have an AES code too. The labels
are now color coded to indicate which codes the location has - grey:none , black:UN code, green: UN code and AES code.
UPDATE
Use the Copy button to copy shipments. You'll have the option to copy cargo details.
Reports, Inttra Status and Quickbooks have been moved to the Tools button.
Contact Manager now has a button to show an example of a correctly filled out contact. Contact Manager
blue labels can be clicked to help fill out info. For example clicking the address2 label will put in
city state and zip code, assuming those fields have been filled out. When saving a billto or vendor, address1
and address2 are now required fields.
Billto,Shipper,Consignee,Notify, Forwarder, Agent and Routed By (same as agents) can now share contacts. When editing contacts, check all the contact types which apply.
Also, selecting a contact with a green background will allow them to log in to a separate application (coming soon) and view the shipment and some documents.
When the separate application for contacts is finished we will let everyone know.
AES:
New AES security requirements necessitate changes to Internet Explorer setup.
You must add:
http://aesdirect.census.gov
https://aesdirect.census.gov
to your trusted sites list (within Tools>Internet Options>Security).
Your list should look like this:
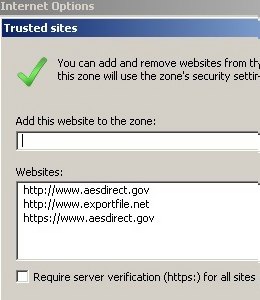
Note the Require server verification checkbox is UNCHECKED.
Also, delete all temporary internet files and cookies to avoid conflicts with older cached versions of AES files.
ITN:
You may now check for the ITN number by clicking ITN Check within the Docs menu. If an ITN exists it will automatically be added to the bottom of the Notes field and also tacked on to your
Clipboard.
If you would like to eliminate the prompt for pasting the ITN number, do the following:
Go to Tools>Internet Options>Security.
Select "Trusted sites" zone, then click on "Custom level" button.
Scroll down to the "Scripting" section (towards the bottom).
Under "Allow Programmatic clipboard access" option, check Enable. Default action for this option is Prompt, which causes a pop-up message whenever there is any attempt to access the Clipboard.
Click OK to exit.
ROUTED AGENT:
If there is a routed agent, please enter the COUNTRY information and choose the correct one in Routed By tab at the bottom.
Pending:
The Pending indicator is now located beside the Mode field.
This allows the user to tell if the file being worked on is Pending or not.
If you right click the Save button the Pending indicator will let the user know if the file has been removed or added to the Pending list.
IMPORTANT UPDATE
1) The pop-up blocker is automatically enabled - you will have to disable it for the application to function.
2) You MUST put http://www.exportfile.net into your Trusted Sites list.
Close all browser windows
Open a new browser window
Go to Tools > Internet Options > Security
Click on the Trusted sites icon
Click the Sites button
Add http://www.exportfile.net into your Trusted Sites list
MAKE SURE that Require server verification (https:) for all sites in this zone is UNCHECKED
Click OK
Then click OK within the Internet Options Dialog window
Close the browser window
Open the application
Pending:
The Pending table is meant to hold shipments that are not completed.
Previously, to remove a shipment from Pending, the MBL# field needed to be filled.
In order to accomodate import shipments this procedure has been changed.
Now, to take a shipment off the Pending list, RIGHT CLICK the save button.
It is also possible to put a shipment back into the Pending list by calling it up and RIGHT CLICK the save button.
The right click on the save button functions as a toggle to remove and add shipments to Pending.
IT IS HIGHLY RECOMMENDED TO KEEP YOUR PENDING LIST CLEAN OF COMPLETED SHIPMENTS
This will keep the database current AND speed up the program
Void:
Once a shipment has been voided, it no longer appears in the table.
You can, however, retrieve it by entering the reference number.
If you subsequently save the shipment it will then show up in the table.
The above is meant as a mechanism to "un-void" shipments.